Why you should use Angular CLI

When I first started working with Angular (back when it was known as Angular 2 beta), I had a hard time getting my head around the lengthy set-up process. After all, all Angular JS required was a single Javascript file, and now I had to download hundreds of megabytes of dependencies, install a compiler, use Node JS and npm, etc.

It was definitely not fun nor easy. Plus that process would change fairly often as Angular would first favor System JS, then Webpack.

Luckily enough for all of us Angular developers, the Angular team listened to our feedback and started working on Angular CLI, a tool to  initialize, develop, scaffold and maintain Angular applications.

The lengthy process finally became much easier:
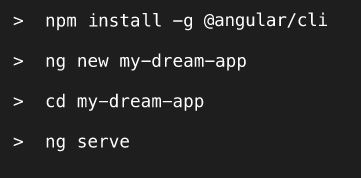
Four simple commands and now you not only have Angular installed, you also get:

  • A local server the serves your app on locahost:4200 when you run ng serve
  • That local server looks for file changes as you develop, and refreshes your app for you in the browser as soon as you save your updates!

The above alone sounds awesome and that’s not it. Angular CLI has a ng generate command that allows you to generate components, pipes, modules, directives , services, classes, etc. When you create a new component using CLI, it generates a sample component for you (with the class name and all of the regular imports that you need) and adds that component to your app module definition.

Oh, and it also generates a sample test specification that you could run later on using… ng test! Functional tests with Protractor are also covered with a specific option: ng e2e.

Angular CLI also helps follow the best practices recommended by the Angular team in terms of folder structure, file names and other coding conventions. Instead of reading the entire style guide, you can just use Angular CLI and follow the best practices by default, which is way easier.

Finally, Angular CLI also helps with your production build or any other kind of build for your different environments (QA, test, dev, etc.). There is a ng build command that you can customize to build for a specific environment, for instance: ng build –env=prod.

As a result, I strongly recommend using Angular CLI. It brings so many features to the table that it would be really difficult to write Angular code without using it. I don’t think I would ever use Angular without the CLI!


Authentication with Angular

One of the questions I hear the most often when I teach Angular is: How do I implement authentication? There are a lot of options out there so I’ll stick with the tools Angular provides out of the box, which allow to implement authentication without any external dependency.

First, I’m assuming that you’re familiar with the Component Router. In a nutshell, the router decides which component to display based on the current URL, thus emulating multi-page behavior in Angular (which is a single-page application framework).

It’s easy to guess that the router will be involved in all-things authentication. By default, configuring a route in the router looks like this:

Now if I want to protect the above route, I can use a guard to do that. The route declaration then becomes:

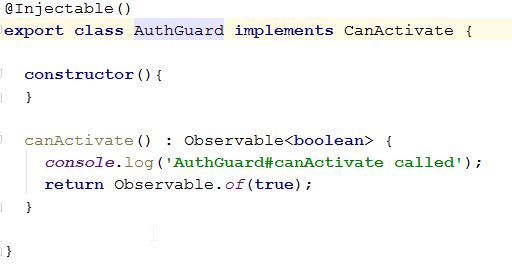
In the above code, AuthGuard is a class that implements the CanActivate interface, which consists of a single canActivate method that returns an Observable. Below is what a basic guard looks like – it has to be an Angular service – note that this one doesn’t do much as it would basically let all requests go through since it always returns true:

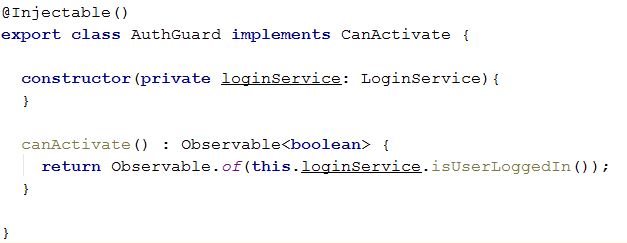
In order for that guard to be useful, it would have to use a LoginService that would tell whether the current user is logged in or not. That’s where the implementation becomes specific to your application as that service will depend on how your back-end wants to authenticate the user. The guard code then becomes:

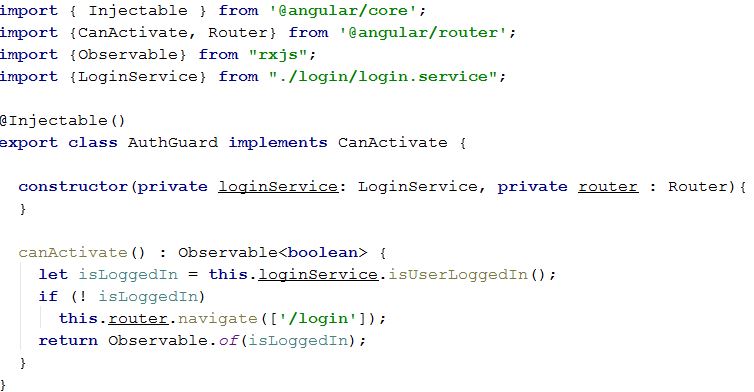
Note that you can also use the guard to redirect the user to a LoginComponent whenever the user has to log in. Here is the full code of such a guard:

You now know the basics of how to implement authentication with Angular. The specifics of what the LoginService would do depends on your back-end, though it is very likely that you will have to make a request to your authentication server and get some kind of token or session object as a result.

How to migrate from Angular 1 to Angular 2?

With Angular 4 around the corner, now is a great time to migrate to Angular 2. There is no rush though as Angular 4 is just the next iteration of what is now called Angular, the new name for v2, 4, 5,6 and so forth. As a result, per the latest branding guidelines, this article should really be titled How to migrate from Angular JS to Angular?

1) Migrate to the latest version of Angular JS

As of right now, the latest version of Angular JS is 1.6. You should really consider upgrading because Angular JS 1.5+ has introduced features that are similar to what Angular now uses (components being the most important one). The main goal for 1.5 and 1.6 was to make the migration to Angular easier, so that’s the first step to take. The migration guide for all 1.x versions can be found here.

2) Get your 1.x code ready for Angular

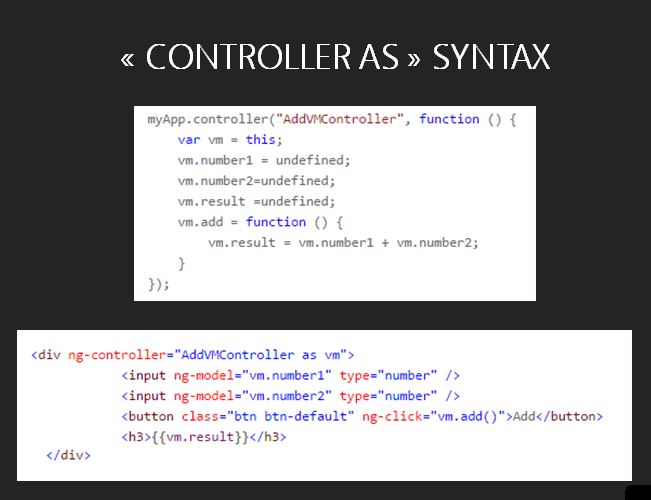
First, remove $scope from your code and use the “controller as” syntax instead. Since Angular uses TypeScript classes, getting rid of $scope and using a syntax that is much closer to actual class properties makes perfect sense. Here is an example of a controller + HTML template that use the “controller As” syntax:

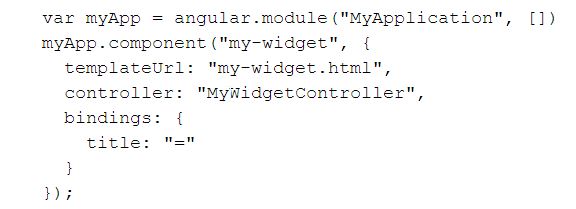
Then it would be a good idea to replace your controllers / directives with components, introduced in Angular 1.5. A component is a directive with a HTML template. Here is what a simple Angular 1.x component looks like – A directive with a HTML template:

The final step is to start learning and using TypeScript in your code. Since TypeScript transpiles down to ES5 code, you can already use TypeScript for development purposes and then deploy the resulting Javascript to production.

3) Upgrade incrementally to Angular

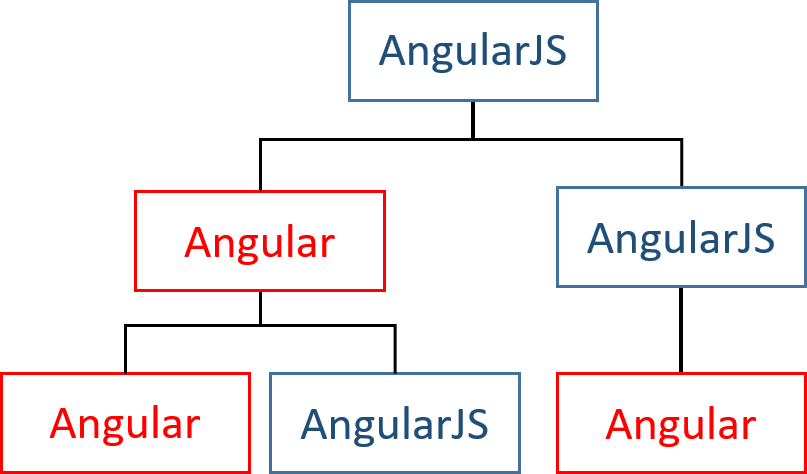
Angular has an upgrade adapter that allows you to mix and match Angulaar JS and Angular in the same app:

The next step is to use the upgrade adapter to migrate your code piece by piece. I would suggest to first upgrade your services, then directives / components. The reason for this is that services are not very different in Angular compared to what they were in Angular JS.

Finally, use the Angular component router and bootstrap your app with Angular.

4) Enjoy and relax!

Seems like an easy process? Not quite, right? That’s why I would only consider upgrading apps if a full rewrite is not an option. In most cases, it’s actually easier to build a new Angular project with CLI and create components / services inspired from your old Angular JS code.

It’s a great opportunity to only keep what you need and to learn Angular in the process as well.